The RPG Beginner’s Guide to Microphones, Cameras, and Streaming

As you may know, I’m a cohost for the newly renamed Mastering Dungeons podcast. This has led me down a path of learning a lot about audio. I want to share what I’ve learned. My first goal is to provide you with basic knowledge on how to achieve great sound and video for podcast, streaming, virtual panels, or online gaming. Secondarily, I want to keep the prices relatively affordable, so you get the best bang for your buck.
While I was relatively new to computer audio and video, I have worked in the audio-visual field during my college and graduate school days, from working large concerts to recording famous personages. I’ve also been a heavy metal drummer in a high school band, so I have street cred at the Flat Swamp Club (located in the North Carolina back woods… I’ll tell you about it another time).
This will mostly focus on audio, because video gets very expensive beyond the basics I’ll recommend.
A note on links. I’ve linked to Sweetwater, a music store that has great customer service and isn’t destroying society the way Amazon does. I don’t make any money off of the links.
How to Sound Awesome
Audio is likely the most noticeable improvement you can make. As one of my audio-visual bosses used to say, when you sound great, no one says anything. When you sound bad… everyone notices and everything you are trying to do is diminished because of it.
Good audio is achieved through the following:
- A quality microphone suitable for your recording area
- Possibly a USB interface connecting the mic to your computer, and if so, possibly a signal amplifier
- A mic stand or boom arm
- Adjusting the software used for streaming, recording, etc.
Microphone
Great audio will capture you, and just you, allowing your voice to sound great. If you are recording anywhere other than a studio or properly treated room, you have the potential for a microphone to pick up a lot of background noise. Stated simply, sound in most rooms will echo, giving your voice an echoing quality that sounds like you are in a bathtub.
That echoing sound often comes from the type of microphone you are using. Most microphones you find on a laptop or bundled with a webcam are condenser microphones. These pull in sound from almost anywhere in your room. As a result, they capture your voice regardless of where your mouth is relative to the microphone. But, they also capture the echo of your voice off of every reflective surface in the room, along with your keyboard and mouse clicks and any other sounds.
It’s also worth noting that most microphones on headsets (even expensive ones) are of relatively poor quality. Though they will sometimes be good about reducing echo, the quality will generally be lacking for podcasts or similar work.
Okay, so what do we do? Unless you have a completely soundproofed room, you want either a shotgun microphone or a cardioid dynamic microphone. A shotgun microphone is a long mic that you can set several feet away from you, pointed at you. It picks up just the zone at which it is pointed, minimizing noise. You must be fairly good about staying in that zone, but the advantage is that the microphone can be placed well outside the range of cameras so they aren’t visible. However, they are expensive.
For most situations, a cardioid dynamic mic is the way to go. There are many different options, and you can still generally place them so they aren’t on screen but still capture your voice well. The word cardioid refers to the heart-shaped “polar pattern” of how the microphone picks up sound. In the image below, you are at the 0 degrees mark, and the microphone is capturing a heart-shaped zone pointed at you, with the microphone at the center. This means it isn’t picking up the sound from behind it (unlike a condenser mic) and it only picks up a few feet from where it is placed… and it will only clearly pick up a few inches from where it is placed. This means that when you tilt it upward towards you, it won’t pick up much from your keyboard or mouse, won’t pick up echoes or other off-screen sounds, and will do a great job of recording you. Awesome!

Want to take a detailed look at this subject? This web page has a great diagram to help you decide on the right mic based on the application.
USB or XLR?
Your microphone has a cable, and needs to somehow get to your computer. The simplest option is a USB mic, which uses your computer’s sound card to process the audio and make it available to your software for recording or streaming or gaming. USB could not be simpler. Plug it into your computer and done!
But, your computer may not have the best sound card. Even decent sound cards are not that great at processing audio. If you want to keep things simple, you can go USB, but make sure your microphone is cardioid dynamic, or at least has that option.
If you are not at all a technical person, USB is likely the way to go. A USB mic such as the Samson Q2u has a boring look, but has great sound and supports either XLR or USB, allowing you to start with USB and then expand later. It comes with all the cables, windscreen, and a stand, for $70!

You can pay a bit more ($100) and go for the Audio Technica ATR2100. You can also consider more popular USB mics such as the Blue Yeti. They can be around $130, and one advantage of the Yeti is that it has 4 polar patterns, so you can select a cardioid pattern and isolate noise. So long as you remember to use the right polar pattern, it’s supposed to be great. But, few experts will recommend the Yeti because there are better options for the price. If you have a treated room, meaning it is well padded and won’t echo, a mic that I can recommend is the El Gato Wave 3, which comes with some nice mixing software. It’s a great sound for a USB mic, but is a condenser mic and may create that echo sound if your room isn’t treated.

XLR
If you are at least a tiny bit technically capable, I recommend an XLR mic. XLR is the type of cable – a traditional microphone cable. You can’t plug that into your computer, so you will need a USB Audio Interface (see below).
If you are willing to go the XLR route, one of the cheapest options is the famous Shure SM58. This has been used for recording musicians since forever, and still is the most likely mic you will see in a recording studio. At $99, it is a great pick and nearly indestructible. Another option is the SM57, also wonderful (I used to record my drums with it back in the ‘90s!).
From there the prices climb as the microphones get better, but also more expensive. James Introcaso turned me onto the Rode Procaster ($229). This is a professional level podcasting and radio microphone that has a wonderful sound. Another favorite is the Shure SM7B ($399), a microphone a lot of audiophiles love. Personally, I would either go for the SM58 if you are price conscious or the Rode Procaster if you can afford it.
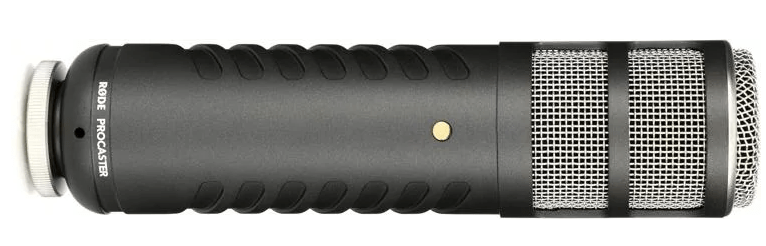
There are many options, and a site like PodcastStage (and their awesome YouTube channel of in-depth reviews) can help you choose one if you are willing to go down the rabbit hole. I did, and I came away with the Procaster.
USB Audio Interface
If you choose an XLR mic, you will have your mic plugging into an Audio Interface with the XLR cable, and then the interface plug into your computer with the included USB cable. The interface acts like a sound-processing pre-amp, taking the audio and converting it with better quality than your computer would. That’s the advantage of going the XLR route: better sound. The disadvantage is having to spend some time (not much) and the cost of the interface.
There are many options, but reader OZ_DM strongly recommends the PreSonus Revelator io24. It has 2 XLR ports and enough gain to run your microphone without also having to use a Cloudlifter. It also adds a real-time compressor, EQ, and a limiter. (A compressor makes your loudest sounds quieter and the quietest ones louder for a more even sound volume. An Equalizer lets you fine-tune your sound. A limiter prevents sound from going over a particular level to prevent clipping.) At $199, this is cheaper than the Focusrite + Cloudlifter option.

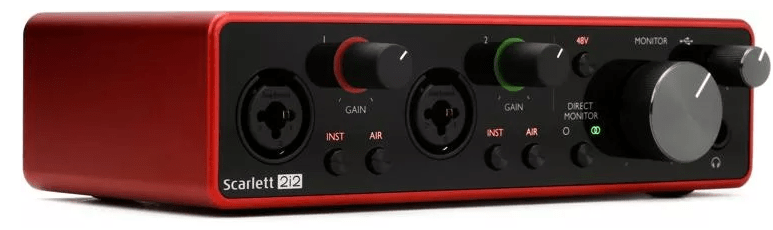
Other options are the Behringer U-Phoria UM2 (only $45) and the Focusrite Scarlett 2i2 3rd Gen ($159). The Focusrite allows for 2 inputs, such as a second mic, and has slightly better visual LEDs. It also comes with software, such as ProTools, you can use to record your audio for podcasts (though free versions exist). I have the Focusrite (it works fine but I would choose a different one today). Reader (and Mastering Dungeons listener) OZ_DM also recommends the MOTU M2 ($170), saying it has better preamps; if you can avoid the Cloudlifter (see below) then this comes out cheaper than the Focusrite.
What you will have is your mic, with the XLR cable running into the front of the Interface. The Interface plugs via USB into your computer. The interface then appears as an audio option on your computer tray, the way you might choose between headphones or speakers.

But, that is one thing you have to deal with when you go the XLR route. Your software, from Zoom to Teams to Discord, will need to be adjusted to tell it to use the interface. Usually, it’s not a big deal. But, sometimes it takes a quick web search to deal with issues where the software is trying to duplicate what the interface does, and therefore creating a conflict that prevents your mic from working until you adjust a setting. For example:
- If using Microsoft Teams and the Scarlett 2i2, you must plug your mic into the first input, not the second.
- In Zoom, you have to turn off any options where Zoom will try to “fix” your sound. Under Zoom’s settings, and the Audio section, turn off “Automatically adjust microphone volume” and under Advanced, the option to “Enable Original Sound” will ensure clean sound.
- For Zoom you may also need to adjust the Scarlett’s buffer size.
- For Discord, under User Settings and Voice & Video, set your input device and then turn off “Noise Suppression” under the Advanced setting. You may also need to toggle your sampling rate.
In my experience, I’ve been able to resolve any conflict in under 30 minutes. Once I’ve corrected that software, it’s been fine. So, I do recommend the XLR route so long as you can do that bit of troubleshooting up front.
Cloudlifter Signal Booster
One last suggestion for XLR mics. You may want to pick up a Cloudlifter ($149), which is a device that goes between your mic and audio interface (requiring one more short XLR cable) and which boosts your signal. This may or may not be needed, depending on your XLR mic.
With the Rode Procaster mic, it was okay without it. However, the Focusrite was at the top of its gain (volume) and having the Cloudlifter meant I had more room to play with the gain so I could be more exact in how load I come across for various recordings and software types. I hear it is a must-have for mics like the Shure SM7B. If in doubt, start without one and add it in if you need a bit louder signal.
Boom Arm
You can’t hold the microphone all the time, so you need a stand. If you use a tabletop stand, it may pick up vibrations when you move things on the desk. And, it’s nice to be able to adjust the mic and move it out of the way. There are some great boom arms that bend in two places and swivel, so you can set the mic where you want it and swing it away the rest of the time.
I recommend the Blue Compass Boom Arm ($99). It is smooth and absolutely quiet, looks fantastic, has a cable run, and is well made. My son uses the cheaper InnoGear stand ($48, Amazon) which is still very good, not quite as stylish, and not quite as well made, but still really excellent.
A boom arm is worth it, as it will further reduce noise and add a lot of convenience.
Audio Budget
Here are two possible audio budgets.
$70 Samson Q2u with cables and desktop stand.
That’s it! You will not go wrong with this setup and you can expand later! Add the InnoGear boom arm and it’s a total of $118.
$229 Rode Procaster
$8.95 XLR cable
$159 Focusrite 2i2 USB Audio Interface
$5.00 short XLR cable
$149 Cloudlifter
$99 Blue Compass Boom Arm
Total: $649.95
Yeah, that adds up! But, you can start with a cheaper mic that supports USB or XLR and slowly add over time. Here is a medium approach with an XLR mic.
$99 Shure SM58
$8.95 XLR cable
$45 Behringer U-Phoria UM2 audio interface
$48 InnoGear boom arm stand
Total: $200.95
Will I Hear the Difference?
Here is an example test. The first Mastering Dungeons podcast I’ve linked to is back when I simply used my webcam. You will hear the echoes when I speak, in contrast to Shawn’s voice. (Shawn uses a USB cardioid microphone plugged directly into his computer).
In this second more recent recording, you can hear my voice through the Rode Procaster, with the Scarlett audio interface. I think the difference is very noticeable!
Finally, good audio is also about your practices. Practice being a consistent distance from your microphone. And, practice speaking at a consistent volume level. It’s okay to raise your voice to show excitement or lower it for dramatic effect, but come back to that baseline level. It’s a skill learned by all announcers and worth perfecting.
How to Hear Your Audio
You could simply use the speakers you already have on your computer. However, it is possible your microphone will pick up some of the sounds, so it’s generally advisable to wear headphones. It honestly won’t matter much what you use. Big headphones, in-ear pieces, they all work.
I have a friend who works at Astro, and I like the look and sound of their headsets. I’ve been wanting to try their in-ear monitors, which I may pick up ($50). A full headset will provide better noise isolation, so you won’t hear kids or a roommate in another room (and your quality microphone won’t pick them up either). In-ear will be more invisible, if you like that look. For a more expensive option, my DJ friend Dread Pirate Rabbits uses the $136 KZ AS16s for both his DJ shows and the Owlbear Soup RPG stream.

How to Look Awesome on Video
There are a number of webcams available, and the hard part is picking one that has great quality and is affordable. In general, quality is not a huge parameter, because you are just you in your room. You don’t really need 4K breathtaking clarity to capture that!
I’ve been supremely happy with the Logitech C920 ($85 Amazon via third parties). This is an old model, but it’s widely held to be superior to the newer more expensive models. I’ve had many positive comments on the video quality, despite the budget price. The microphone is a condenser, so you still want to use your own microphone and not the one on this unit. But, for maximum budgetary concerns and just for something like playing RPGs on a virtual tabletop, it’s passable audio.
Another option is if you have a spare phone or professional video camera you are not using. You can convert it to a webcam by downloading an app that will interface between that camera and the computer from which you stream. You can also do this to have a second camera (described below).
From there, you can look into more professional cameras. I recommend doing so if you will be working with a more extreme setup, where you are streaming often and need a combination of features. For example, if you watch an MCDM YouTube stream, Matt uses a more professional camera that is set relatively far from him, and then he looks at a monitor that has a type of teleprompter on it, which allows him to always look at the camera while seeing his notes. A device on his desk lets him control his teleprompter style notes. In this kind of situation, you need a high quality video camera (Nikon, Canon, etc.) connected to your computer, and likely much more.
Another possibility for expert gear is when you need to switch between several angles, such as to show product reviews or paint miniatures, and switch back to your face. You need at least two cameras, with one on a boom arm or mounted to your ceiling overhead, and you need software that lets you switch, and you need something (such as a foot pedal or easy to activate switch) so you can switch the view easily while you hold a product or mini and paintbrush in your hand(s). This is beyond what I cover here, though you can find some great suggestions for intro to medium lighting, teleprompters, backdrops and more on Ginny Di’s site.
For those of us simply wanting to capture our upper body as we play a game on a virtual tabletop or attend a virtual panel, the Logitech C920 is great.
Lighting
Proper lighting will make a huge difference in the look of your recordings. Improper/insufficient lighting forces your camera to give up resolution in an effort to properly illuminate your face or room.
In general, you want diffuse lighting rather than a spotlight shining on you. This is achieved cheaply by bouncing a light off a wall. Even a regular lamp might work when you point it at the ceiling or a wall and that light bounces off and illuminates you. You may need to experiment with bulbs to achieve the right warmth.
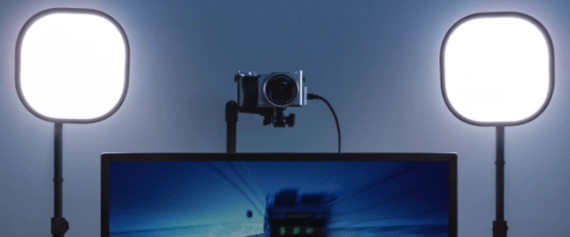
You can also find all manner of stands and lights, from elaborate setups to the newer and recommended ring lights and soft LED boxes/panels. These lights are LED for low power consumption, warm so you look like real flesh and not pale blue, and illuminate you in a soft manner rather than creating shadows or sharp edges. Some, such as options by El Gato, can connect to a peripheral “Streamdeck” you put on your desk so you can alter the lighting via pushing a button. I don’t have any specific recommendations at this time, but Ginny Di has some.
If you have a big budget and will see benefits from the integration to a Streamdeck, the El Gato Key Light ($200, $400 for 2) and Key Light Air ($125, $250 for 2) are considered top choices. They provide bright illumination, a range of color temperatures, and you can control it all via the desktop app or on your phone or Streamdeck. Note that you will need two for proper lighting!
Alternatives include the cheaper Dazzne Desk Mount ($195 for 2), which saves your settings and has a remote. The Viltrox VL-200T ($70, $140 for 2) offer good features and lighting (may be too bright for some) and has a remote. The Viltrox L116T comes in a 2-pack (just $70 for 2, but smaller and few features), though you will want to pick up two arms and desk clamps to elevate them.
Backdrop
The background behind you may or may not be important. It’s not really a factor if you are playing an RPG with your friends. It is important if you are streaming product reviews.
You may be able to organize your recording area so it is visually appealing. A bookcase of games works great as a backdrop, as do maps from adventures!
Some meeting software, such as Zoom, will allow you to alter your background digitally. You could also get a green screen (roll-up models exist, or you can even paint your wall) and then use software that allows you to replace that color with the image of your choice.
How to Stream
This is a huge question, with many possible options depending on what you are doing. I’m just going to cover the basics to get you started. You will need further research, depending on your specific needs.
In general, “streaming” refers to sharing your video content with the public, usually live. You need software to get what you are recording to a place people can watch it. The simplest method is to set up a creator account on either Twitch or YouTube (or both) and use software called Open Broadcaster Software or OBS.
OBS will allow you to set up your video source, audio source, share parts of your screen, display images or video, display the chat in Twitch, and much more. You can find tutorials online, but as software goes it is not too hard to learn. OBS is free, which is amazing.
You can see how I’ve gone about learning about streaming here. I use OBS with my simple webcam and I share both live and prerecorded sessions where I play the D&D Neverwinter MMO and discuss the lore and history of the game’s areas. I stream live to my Twitch channel, and because those games disappear after a few days, I turn them into highlights (which don’t get deleted) and I export from Twitch and import into my YouTube channel (which won’t get deleted either).
For streamed games, you generally will spend time setting up all of the video cameras from a Zoom call or similar setup and then add an “overlay” that has visual appeal and adds the names of participants, your game name, and so on. Again, there are tutorials out there and you can hire great people to do the work for you as well.
There is a lot to learn about streaming. Start small and practice. You can also prerecord using OBS and then edit as needed, then stream the recording as if it was live. The latest Acquisitions Inc recording and the Stranger Things D&D game were both done this way. You don’t get to interact with chat live, but most GMs and players can’t focus on a live chat anyway, especially with the built-in streaming delay.
It’s also worth knowing that streaming often requires moderation of the chat. That means someone has to watch what people type to make sure it meets your content standards. You probably want someone who is not in the game to do that. You don’t need this if you don’t have a large audience, thankfully! Still, make sure you keep an eye on the chat and review how to delete a comment before you start recording.
Online Gaming
If you are simply playing an RPG with friends, you may simply use Discord. It handles video, audio, and chat. Zoom and Google Meet and similar software will also work. Virtual Tabletops like Roll20, Fantasy Grounds, and Owlbear Rodeo can all let you use virtual minis, handouts, and dice rolling. There are tons of options, and you can combine these with streaming as well.
I hope this beginner’s guide has been useful. If you want more information on a particular topic, let me know. Also, if you have recommendations of your own, leave them below!
14 comments on “The RPG Beginner’s Guide to Microphones, Cameras, and Streaming”
Leave a Reply
Support This Site

 Mastodon
Hi,
If you have purchased the MOTU M2 you would not have needed to purchase the cloud lifter as the MOTU has better preamps for the microphone than the scarlet.
You also need to apply some sound dampening to you room (removalist blankets) to stop reverb as you room at home. Treating the wall in front of where you are speaking is the first place to start. You are treating by absorption.
For voice production you should really consider Hindenburg Journalist PRo as it is specifically designed for podcasters and has very neat tools. It’s always on sale on world radio day which is coming up 13th February. Consider joining the Hindenburg offical Facebook group and attending some of their free seminars. That said what you are doing is good this might be a labour saving option.
You can use Craig.bot to record multiple discord channels at once, each is captured as a single track so it makes mixing and editing each voice possible. It’s how I do podcasts of my games for home use – we record 8 individual tracks.
It’ great you have stepped up you audio as it was pretty bad.
Lighting is good but you omitted soft boxes and diffusion as this improves how light looks as a texture.
Also provided you give them a credit you can use Syrinscape sounds in your podcast it’s in their FAQ. This means you can add a snowy background to parts of your review of Rime of the frost maiden.
All the best
I really appreciate this, thanks! Moving blankets are great for sound dampening. Absorption is great… even pillows around a monitor can work. And if it is strictly audio… there are those who cover themselves in a blanket as they record! It’s really about looking at all the reflective surfaces and seeing what could be done about them, and addressing them will all improve sound quality. There is a reason musicians and radio hosts record in a studio.
A lot depends on how flexible one can be about their room – whether it must do double duty as another kind of room and not have permanent dampening, whether you can install a few hooks on the ceiling and drape when needed, or something else.
I had not looked into the MOTU M2 ($170 or so), but that’s great to know. Thanks!
Great call on Syrinscape. I have used them during livestream games. I should look into it for other types of recordings. Of course… it all adds to the effort required and time is something I always lack!
You won’t need much sound dampening as your choice of microphone was a good choice and I heard the difference in your reverb the instant you spoke with your new setup. Its much better value than the SM7b.
Here is the link to Podcastage Youtube on the MOTU 2 to save you the time https://www.youtube.com/watch?v=n25WIe_J4YY
And here is Podcastages 10 tips for great sound: https://www.youtube.com/watch?v=Ty8YLqOmbV4
With Hindenburg you can create clipboard bits of sound and you can copy direct from Syrinscape into the software. The unique feature about Hindenburg is the clipboard – makes production ever so easy.
Hindenburg also has a voice profiler which can modulate your voice. So if you have a cold or a bad day it will correct the sound for you so you sound like you. Here is a video on it (3 mins): https://www.youtube.com/watch?v=lUp0XrlRTEo. If you do move away from the microphone a bit it will address it to a point and it managed. Hindenburg manages LUFs perfectly and will upload to your host provider as well – saving you precious time.
There are other options to Syrinscape for game sounds. You can learn about them here: https://technicalrpg.com/sound-options-for-virtual-table-top-and-in-person-role-playing-game-sessions/
Hello again,
I’ve been doing more research and I have found some videos which I really think needs highlighting.
Julian Krause YouTube Channel (https://www.youtube.com/channel/UC0HrD4cTsQpAZ8KK9jPzzGg) is excellent and its recommended as the place to go for factual information on audio interfaces.
I recommend you watch all of these.
Explaining What Gain Does in an Amplifier – Audio Recording Myth Debunked!!! (preamp noise misconception) https://www.youtube.com/watch?v=smW1mPbz-wU
Do you really need a Cloudlifter or FetHead? (ft. Shure SM7B) https://www.youtube.com/watch?v=T8HwNnJAjbQ
Scarlette 3rd Gen Review: https://www.youtube.com/watch?v=VSgzF79ivd0
If you want the ultimate in live streaming (real-time eq, compression and amplification you should consider the DBX 286s but its only for the serious level https://www.youtube.com/watch?v=tzfKVjtf5dM
Also, I noticed that your co-host on Mastering Dungeons in recent episodes has been peaking and clipping. As a USB microphone you can adjust the gain but its done in the window software settings.
I also noticed some audio interference – sounds like a loose cable.
Thanks so much! It’s amazing how much knowledge is needed, so I greatly appreciate this. Just today I was working on eliminating a repeated clicking sound (the interference), which I think I resolved through a driver update and perhaps changing the sampling a bit. I’m also looking into some latency that I didn’t have before. We have been working on the clipping as well and will keep working on it. Thanks!
Hi,
You are most welcome. You are doing great. Its practice and learning – like writing great 5e material.
I forgot to include this one from Julian its a must to watch about gain myths on interfaces.
https://www.youtube.com/watch?v=beXVfl1TSD0
You will be fine with 16bit and 48Khz sampling rate for voice. 32bit is for whispering followed by immediate jet engine recording. The BBC uses 24bit.
In its simplest terms, hi-res audio tends to refer to music files that have a higher sampling frequency and/or bit depth than CD, which is specified at 16-bit/44.1kHz.
If you want to learn about bit and sampling rate watch this: https://www.youtube.com/watch?v=xyMUAWXjrhA
Unfortunately the best way to get rid of clicks is to not record them. Tools like RX7 can help but its an expensive solution to tinkering with setup (and time consuming).
You will be fine to record voice between -18 and -12DbA. This gives you plenty of headroom to laugh and cry out without clipping. Shawn has a good strong voice and pretty good technique so he can probably drop the recording level in Windows a bit and pick it up in post production and – as his signal to noise ratio is high. One of the Julian Krause video linked above will help you understand this concept.
Podcast Engineering School has some great episodes if you have the time on your commute. This one from Twenty Thousand Hertz is pretty great https://podcastengineeringschool.com/dallas-taylor-host-and-creator-of-twenty-thousand-hertz-pes-217/
Finally you might like this episode for your Van Richten episode: How Hollywood makes scary (spooky sounds) for horror films: https://www.20k.org/episodes/spookysounds
This episode from Twenty Thousand Hertz explains fundamentals of sound and hearing with Bill Nye: https://www.20k.org/episodes/sound101
All the best.
My Daughter is 7 and loved the Bill Nye Episode
https://www.20k.org/episodes/sound101
Its one to run in the car as the effects play out really well in that environment. I had to play is 3 times, and she learnt a heap.
Thanks for all the help! We made some adjustments to the audio for this week’s show (out Thursday). Let us know how that sounds! We will keep tweaking as we go! So much to learn!
Pingback: Holiday Shopping Guide for the D&D Fan | Alphastream
Pingback: Setting Up Obs To Record Roll20 And Discord - DiscordWire
I heard Mike Shea says he copied your recipie.
The interface he should have purchased for his use which includes livestreaming is a PreSonus Revelator io24. Even tho it has two XLR ports.
This is because it has enough gain to run anything including using the SM7B (no cloudllifter) but also built real time in compressor, eq, and a limiter which is super useful for Mike as he gets excited live which means clipping and a limiter.
Podcasting and livestreaming are different. The PreSonus io24 is a better option than focusrite and a cloudlifter (cheaper too)
Thanks so much! I’ve updated the post with a link and image.
WHAT DO YOU MEAN I GET EXCITED!!??
I’d love to have an interface board with a compressor. Being an amateur, I’d be worried I’d screw things up more than help. I do run some software compression in post production and I imagine I could drop in a compression plug-in in OBS for the stream itself. At this point I already have the Focusrite Solo and I’m just about to return the Rode Procaster because I really found no extra value in it for the money and the thing is this huge log sitting in front of my face the whole time. Just too big for me to wave my arms around like Animal in the Muppets.
That Shure SM7B is tempting. Maybe someday after more research. One thing I’ve learned is that the equipment itself isn’t the hard part, it’s learning how to use it. Both my camera and audio setup has required a ton of ramp-up work and I’m no expert. I’d love some help!
Hi Mike,
Choosing a microphone is task specific. The Shure SM7B won’t help you at all as you still need to shove it in your face. Ignore the YouTube trend and save your money.
For the record I have a Procaster I’m Australian as is Rode. It sits on a Rode PS1 microphone stand and yes it’s in your face but I play using Fantasy Grounds VTT with discord voice only aonit works just great. My alternative is a Rode NTUSB which is a condensor microphone which picks up more.
The Q2U worked well so the question is why did you change it? As a rule there is generally diminished returns the more you spend on a microphone. Keep in inind most podcasts are listed to on earbuds and car stereos and it’s compressed audio hardly audiofile stuff. What you do want is a nice dry sound and apart fro minor clipping (excited Mike) – you have always achieved that.
Tip 1 microphone always close to your mouth. Helpful for an untreated room and your voice (a good strong voice you have) will drown out any room reverb. This is something Te’o’s has improved as the room he recovers is a concrete box
Questions- do you not want to see the microphone in the video – if so consider a shotgun microphone on a boom arm just out of frame. But then you can’t weave about or you will move out of the optimal zone. Don’t use a wheeled or swivel chair.
Is there more than one use case – do you want to do anymore walk and talk episodes? I recall you did one wearing a hat.
If so possibly a lavallier microphone connected to a Rode Wireless Go 2 transmitter (or without a lavallier) might be your best option.
For a shotgun perhaps the Rode videomic 2 on a boom arm so you can get iit as close as possible. if you want to spend a bit more the he Rode Videomic NTG again on a PSA1 stand (the stand is possibly the best value purchase you can make – also good for cameras). Both are USB and have software to assist.
Can’t help you with OBS but the workflow you have seams efficient as it quick to upload to podcasting If you want to up the Podcasting software then my goto is Journalist (they run free podcast training courses all the time you can attend).
Limiter.for the stream not compressor. A limiter stops you voice reaching 0db or greater (when clipping occurs).
Do search for PreSonus Revelator io24 reviews there is one by a bearded Brit that provides a good overview.
Wild Beyond the Witchlight reads like D&Ds Fraggle Rock to me – animal Mike would be a hoot at the table!